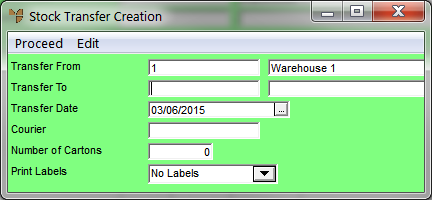
Whenever you create a new stock transfer batch, or load an existing one, Micronet displays the Stock Transfer Creation Header screen where you enter the main details of the batch.
Refer to "Creating a New Stock Transfer Batch".
Refer to "Recalling a Stock Transfer Batch".
Micronet displays the Stock Transfer Creation Header screen.

|
|
Field |
Value |
|
|
Transfer From |
Micronet displays the ID and name of the warehouse you entered on the Stock Transfer Creation screen. This is the warehouse you are transferring the stock from. |
|
|
Transfer To |
Enter the ID of the warehouse you are transferring the stock to. You can also press Tab or Enter to select a warehouse. Micronet displays the warehouse name. |
|
|
Transfer Date |
Enter or select the date of the stock transfer. |
|
|
Courier |
Enter the ID of the courier from your courier master file for the consignment docket printing. |
|
|
Number of Cartons |
If you know how many cartons this stock transfer will be packaged in for courier delivery, enter the number. Micronet uses this number to determine how many labels it needs to print. |
|
|
Print Labels |
Select whether you want labels created for this stock transfer batch and the quantity required. Options are:
When you select any option other than No Labels, Micronet creates a batch with the items and label quantities specified when the stock transfer batch is posted. To recall this batch for viewing, altering, printing or deleting, refer to "Inventory Reports - Batch Label Report". |
If there are any user defined questions for the stock transfer header, Micronet displays the User Defined Questions screen. Refer to "Stock Transfer Creation Header - Edit - User Questions" for more information on that screen.
Micronet redisplays the Stock Transfer Creation screen.